Saturday, December 24, 2011

Paterllar retinacular ligament

An axial proton density-weighted image with fat suppression reveals complete disruption of the medial retinaculum at its patellar attachment (arrow)
The patella has two articular surfaces, one is long while the other is short.
Long patellar articular surface is on the lateral side while the short one is on the medial side as seen in the below x-ray.


Quadriceps and patellar tendons

Normal Extensor mechanism: The quadriceps tendon comes in three layers (orange arrow).
Patellar tendon (blue arrow) and quadriceps tendon have a sharp posterior demarcation.


Sagittal view with insertion of biceps tendon and lateral collateral ligament in the head of fibula.

Anatomy of cruciate ligaments

1-Present in the middle of the knee joints.
2-We have two ligaments, anterior and posterior cruciate ligaments.
3-Both originate from posterior surface of the lower femur and then the anterior one inserts in the anterior aspect of the proximal articular surface of the tibia while the posterior one inserts in the posterior part of the proximal articular surface of the tibia.
4-Search first for the posterior cruciate ligament in sagital view as it is large enough to be seen easly, then go one slice medial or lateral to that slice, usually you can see the anterior cruciate ligament if the angle of the technique was taken in a good manner or if the anterior cruciate ligament is not teared, if not, look in the coronal view, you can see the anterior cruciate ligament attached to the lateral femoral condyle in the inter condylar notch if the technique is improper, and if you cannot see it, so it will be teared.
5-Posterior cruciate can be seen with the menisco-femoral ligaments are related to it.

Posterior meniscofemoral ligament on MRI, coronal

Posterior meniscofemoral ligament on MRI, sagittal

Posterior meniscofemoral ligament (Wrisberg) behind the posterior horn of the lateral meniscus close to its insertion. Sometimes wrongly interpreted as a meniscal tear.
So in the sagital plane, posterior to the posterior horn of the lateral meniscus, we have two structures which could make confusion with posterior horn tear of the lateral meniscus, these two structures are the tendon of popliteus muscle which appears as vertical linear hypo intense structure posterior to posterior horn, while the second one is posterior menisco-femoral ligament.


Anterior meniscofemoral ligament(Humphrey ligament)


Meniscial anatomy

1-We have two menisci medial and lateral.
2-The medial meniscus is much longer than lateral one and have wider curve.
3-Medial meniscus is banana shaped, while the lateral one is C shaped.
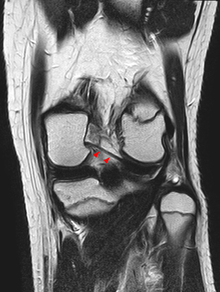
4-Each meniscus appears as a triangle with hypo intense signal (do not contain water), any intensity seen inside meniscus should be considered abnormal.
5-Each meniscus appears in MRI image formed from anterior horn and posterior one if it is seen in its medial parts while if it is cutted laterally, it will be seen as one unit (body) as seen in the diagram below.
-Remember that in all films of sagital MRI knee, you should find the patella on your left as a viewer, so you can verify always the anterior from posterior horns of menisci.


Normal lateral meniscus. Sagittal FSE PD (TR/TE 2200/15). Image is at the central aspect of the meniscus and demonstrates the triangular configuration of the anterior and posterior horns of the meniscus which are equal in size.

-How to identify lateral from medial menisci:
*By looking to the fibula if it is seen in the field of view.
*From the shape of the upper end of the tibia, where it has a lip where it join the fibula.
*The most important differentiation is that the anterior and posterior horns of the lateral meniscus are equal in size, while in the medial meniscus the posterior horn is always bigger than the anterior horn.

Lateral meniscus

Medial meniscus

Meniscial body

-Take care that just behind the posterior horn of the lateral meniscus there is the tendon of popliteus muscle which could be mistaken as a part of the posterior horn(Remember also that the length of the posterior horn is equal to the anterior horn of the lateral meniscus, so look to the posterior horn, if it is in the same size as the anterior horn, this means that the black area behind it is popliteus tendon and vice versa.

As the popliteus tendon (arrow) courses posterior to the posterior horn of the lateral meniscus, a vertical signal intensity region (arrowhead) is evident on sagittal views. This normal appearance can be confused with a longitudinal meniscal tear.


Friday, December 23, 2011

How to read MRI knee joint case

1-Remember, the most important film is sagital proton density.
2-Sagital proton density, you should verify the following(from outside to inside):
- Medial and lateral menisci.
-Cruciate ligaments.
-Quadriceps and patellar tendons.
-Biceps femoris tendon.

3-Coronal T2, you should verify the following:
-Collateral ligaments.
4-Axial T2, you should verify the following:
-Retinacular ligaments of patella.

5-In addition to bones and synovial effusion, should be evaluated in sagital T1 and T2.

Kinematic MRI


-Kinematic MRI means that the patient is imaged while he is doing the movement of the joint producing the pain.
-In clinical practice, usually you are facing with patient suffering from knee pain, and when you did for him a Knee MRI the results are normal, simply because you do not do the study in the proper situation producing the pain.
-When the knee is moving during imaging, you can discover the cause of the pain.

Structures with high signal intensity in T1 and intermediate signal T2

Is the fat which could be noted in the subcutaneous area, or dermoid cyst.

Structures with low signal intensity in T1 and high signal T2

Is the fluid which could be due to effusion, cyst or articular cartilage.

Structures with low signal intensity in T1 and T2

These structures contain non mobile protons such as :

-Cortical bone.
-Tendons.
-Ligaments.
-Calcification.
-Particularly we can add menisci in the knee.

Examination technique

1-Use of surface coil for one knee as seen below.


2-Each part of the body has its own coil which is proportionally with the shape of this part.
3-Field of view(FOV)=16 cm.
 When you increases the field of view, the organ of interest is decreased in size, while if you decreases the FOV, the organ of interest is increased in size(inverted relationship).
4-Protocol of examination:
-Sagital T1,T2, and proton density(most important image taken in knee).
-Coronal T2(ordinary T2, gradient or STIR).
-Axial T2.
-STIR means Short T1 Inversion Recovery.
-Proton density makes water intermediate between T1&T2(High TR and low TE).
If the water is black in T1, and white in T2, so it will be grey in proton density.
Proton density image is the most useful image used in the knee examination.
Look at the articular cartilage which is composed of water, if it is grey, so you are dealing
with proton density image or look to TR on the film well be high while TE is small.

T1

Gradient

STIR

T2

Indication for MRI knee joint imaging

Mnemonic  S T O P  I T
Where 

S---Swelling.

T---Trauma.

0---Osteoarthritis.

P---Pain.

Then

I---Inflammation.

T---Tumors.

This indications could be applied to any joint.

Knee joint introduction

-Is the most common area involved by diseases after spine and brain.
-Most of the investigation done are related to knee joint.